Windshield repair is a critical aspect of vehicle maintenance that often goes overlooked by many drivers. The windshield serves not only as a barrier against the elements but also plays a vital role in the structural integrity of the vehicle. A compromised windshield can significantly affect the safety of the vehicle, especially in the event of an accident.
When a windshield is damaged, it can lead to reduced visibility, which increases the risk of accidents. Moreover, a damaged windshield can weaken the overall structure of the vehicle, making it more susceptible to collapse during a collision. Therefore, addressing windshield damage promptly is essential for ensuring both safety and compliance with legal standards.
In addition to safety concerns, timely windshield repair can also save drivers money in the long run. Many insurance policies cover the cost of windshield repairs, often waiving deductibles for minor damages such as chips or cracks. By opting for repair instead of replacement, drivers can avoid the higher costs associated with full windshield replacement, which can range from several hundred to over a thousand dollars depending on the make and model of the vehicle.
Furthermore, repairing a windshield is typically a quicker process than replacement, allowing drivers to get back on the road with minimal disruption to their daily routines. Thus, understanding the importance of windshield repair is crucial for both safety and financial reasons.
Key Takeaways
- Windshield repair is important for maintaining the structural integrity of the vehicle and ensuring driver safety.
- Common windshield damage includes chips, cracks, and bullseyes, which can impair visibility and compromise the strength of the windshield.
- Choosing the right windshield repair kit is crucial for effectively addressing the specific type of damage.
- Properly preparing the windshield for repair involves cleaning the area and ensuring it is dry and free of debris.
- Applying the repair solution and following the manufacturer’s instructions is essential for a successful windshield repair.
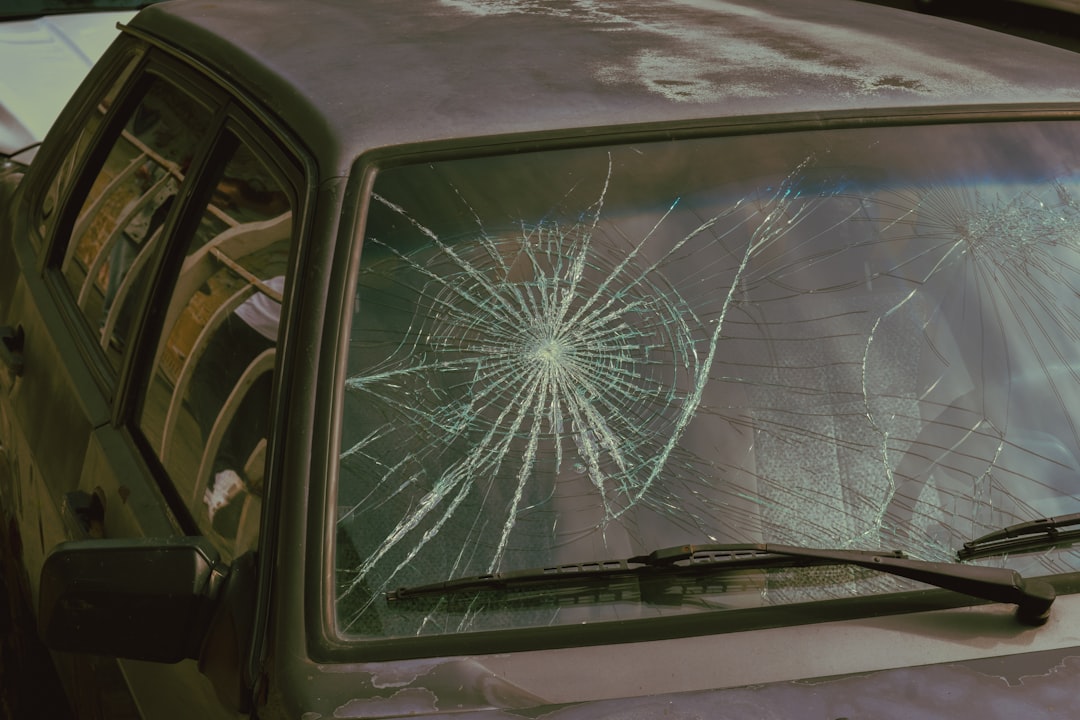
Identifying Common Windshield Damage
Windshield damage can manifest in various forms, each requiring different approaches for repair. The most common types of damage include chips, cracks, and scratches. Chips are small indentations that occur when a hard object strikes the glass, often leaving a circular mark.
These can be as tiny as a pinhead or larger, depending on the impact force. Cracks, on the other hand, are linear fractures that can extend across the glass and may branch out into multiple directions. They can be caused by temperature fluctuations, road debris, or even improper installation of the windshield itself.
Scratches are typically superficial and may not compromise the structural integrity of the glass but can still impair visibility. Identifying these types of damage early is crucial for effective repair. For instance, a small chip can often be repaired if addressed promptly, but if left unattended, it may develop into a larger crack that necessitates a full replacement.
Drivers should regularly inspect their windshields for any signs of damage, especially after experiencing rough road conditions or severe weather. Additionally, understanding the difference between minor and major damage can help in making informed decisions about whether to repair or replace the windshield. For example, if a crack is longer than three inches or located in the driver’s line of sight, replacement may be necessary to ensure optimal visibility and safety.
Choosing the Right Windshield Repair Kit

Selecting an appropriate windshield repair kit is essential for achieving effective results. Various kits are available on the market, each designed to address specific types of damage. A typical windshield repair kit includes resin, an applicator tool, and sometimes a curing film or UV light to expedite the hardening process.
When choosing a kit, it is important to consider factors such as the type of damage being repaired and the quality of materials included in the kit. High-quality resins are crucial for ensuring a strong bond and clear finish after repair. Additionally, some kits are designed for DIY enthusiasts while others are more suited for professional use.
DIY kits often come with detailed instructions and are user-friendly, making them accessible for individuals without prior experience in windshield repair. However, professional-grade kits may offer superior materials and tools that can yield better results but may require more expertise to use effectively. It is also advisable to read reviews and seek recommendations from trusted sources to ensure that the chosen kit has a proven track record of success.
Investing in a reliable windshield repair kit can make all the difference in achieving a seamless repair that restores both functionality and aesthetics.
Preparing the Windshield for Repair
| Step | Description | Time Required |
|---|---|---|
| 1 | Inspect the damage | 5 minutes |
| 2 | Clean the area around the damage | 10 minutes |
| 3 | Apply resin to the damaged area | 15 minutes |
| 4 | Cure the resin with UV light | 10 minutes |
Proper preparation of the windshield is a crucial step in ensuring a successful repair process. Before applying any resin or adhesive, it is essential to clean the area surrounding the damage thoroughly. This involves removing any dirt, debris, or moisture that may interfere with the bonding process.
Using a glass cleaner and a lint-free cloth can help achieve a clean surface. It is also advisable to inspect the damage closely to determine if any additional steps are needed before proceeding with the repair. Once the area is clean, it is important to assess whether the damage is suitable for repair.
For instance, if there are multiple cracks radiating from a single point or if the damage extends beyond a certain size, it may be necessary to consider replacement instead of repair. Additionally, environmental conditions play a significant role in preparation; repairs should ideally be conducted in dry weather and at temperatures above 50°F (10°C) to ensure optimal curing of the resin. Taking these preparatory steps seriously can significantly enhance the effectiveness of the repair process and lead to better long-term results.
Applying the Repair Solution
The application of the repair solution is where precision and technique come into play. After preparing the windshield and ensuring that it is clean and dry, it’s time to apply the resin using the tools provided in your repair kit. Most kits come with an injector tool designed to create suction over the damaged area before injecting resin into it.
This suction helps draw out air from within the crack or chip, allowing for better penetration of the resin into any voids present. Once suction is established, carefully inject the resin into the damaged area according to the instructions provided with your kit. It’s crucial to ensure that enough resin fills all parts of the damage without overflowing onto surrounding glass areas.
After injecting the resin, some kits require you to place a curing film over it to protect it from dust and debris while it hardens. Depending on environmental conditions and product specifications, curing may take anywhere from 30 minutes to several hours. During this time, it’s important not to disturb the area to allow for proper adhesion and curing.
Polishing and Finishing the Repair
After allowing sufficient time for curing, polishing and finishing touches are necessary to achieve a clear and smooth surface on your repaired windshield. The first step in this process involves removing any excess resin that may have spilled over during application. This can typically be done using a razor blade or scraper tool included in your repair kit.
Care must be taken not to scratch or further damage surrounding glass while performing this task. Once excess resin is removed, polishing compounds may be applied to enhance clarity and restore shine to the repaired area. Using a soft cloth or polishing pad, gently buff the repaired section until it blends seamlessly with the rest of the windshield.
This step not only improves aesthetics but also helps eliminate any minor imperfections left after curing. A well-polished repair will not only look better but will also help maintain visibility by reducing glare from sunlight or headlights at night.
Testing the Repaired Windshield
Testing the repaired windshield is an essential step that should not be overlooked after completing repairs. Once you have polished and finished your work, it’s important to inspect both visually and physically for any signs that might indicate an incomplete or ineffective repair. Start by examining the repaired area closely; there should be no visible cracks or bubbles remaining in or around where you applied resin.
Next, conduct a water test by spraying water over the repaired area to check for leaks or moisture penetration. If water beads up and rolls off without seeping into any cracks or chips, this indicates that your repair was successful in sealing off any openings in the glass. Additionally, take note of how well you can see through that section; clarity should be restored without distortion or haziness affecting your line of sight while driving.
Tips for Maintaining a Repaired Windshield
Maintaining a repaired windshield is crucial for ensuring its longevity and effectiveness over time. One key tip is to avoid extreme temperature changes immediately after repairs; sudden shifts from hot to cold can cause stress on newly cured resin and potentially lead to re-cracking or further damage. It’s advisable to park your vehicle in shaded areas during hot weather or use sunshades when parked outside for extended periods.
Regular inspections are also beneficial; periodically check your windshield for any new chips or cracks that may develop due to road conditions or environmental factors like hailstorms or falling debris. If you notice any new damage forming around previously repaired areas, address them promptly before they worsen into larger issues requiring more extensive repairs or replacements down the line. In addition to these preventive measures, consider applying protective coatings designed specifically for windshields after repairs have been made; these products can help repel water and dirt while enhancing visibility during inclement weather conditions.
By following these maintenance tips diligently, you can ensure that your repaired windshield remains functional and safe for years to come.